How To Make A Full Wig With Lace Closure Beginner Friendly | March Queen Hair
- Posted on 08 November, 2017
- Lace Closure
- By Anonymous
How To Make A Full Wig With Lace Closure
Hair used in Video: https://www.marchqueen.com/4-bundles-b...
Use Coupon code: shia20 to save $20 off on every order
Product details:
Lace Closure Length: 22 inch
Hair Bundles Length: 22 22 22 22inch
Hair Color: 1b/99j Ombre color
Hair style: Brazilian body wave
Amazon Link: https://www.amazon.com/dp/B0776QWRWK/?...
Use Coupon code: BLKXD4UH to save 15% off on this hair
Connect With Me:
Snapchat Instagram & Facebook
@shiashefawn
For Business Inquires Please Email [email protected]
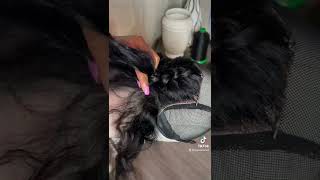
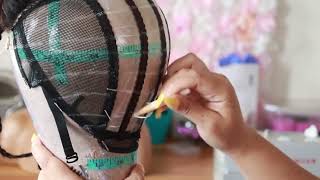
You'Re gon na need, of course, it's your hair, a choice. I do have four bundles of 22 inch Brazilian body way from March, Queen hair, the hair did come on braids like this. I did watch the hair already because it is human hair. I always wash it when I first receive it, and then I conditioned it and just let the hair air dry. I also have a 22 inch body way, but closure as well, and the link to March Queen hair will be down below in the description box. If you guys are interested in checking out their website, it is easier for me to keep all of my materials in arm's reach. As on making the wig, I do have some scissors some hair clips, a thing of thread. I got this thread from the beauty supply store. I have a comb some pins to pin down the cap so that it doesn't move and then a needle of choice. Some people prefer a straight needle. Some people prefer a curved needle. I like to have curved needles. It'S easier for me to grip them, because I do have long nails. Now. When I first started making wigs, I did use a Styrofoam head. It did have a lot of mistakes using a Styrofoam head, because sometimes the cap will be too small or the cap would be too big. It just never worked out, so I did invest in a canvas head. My head, circumference, is about 22 inches, so I did get a 23 inch. This is the cap of choice that I like to use it's a regular dome cap. I do use my pins to pin it down before. I start sewing so that the cap does not move, and that way I know that it will fit comfortably on my head. So this is how I make sure my cap in the wig is nice and comfortable. I also like to thread about five to six needles before I start as well, you don't have to do this, but I just find it to be easier, so this is just something that I always do before. I start, starting with your closure. It'S very important that you take the time to line up the hairline of the closure with the cap. You can't bring it forward a little if you would like, but you want to make sure it's very close to it, so that when you get to the end and it's time to cut the cap, underneath it lines up properly with the rest of the cap and It sits on your head, the right way so make sure you pin it down and make sure it is lined up correctly so that you don't have any issues when you get to the end, once you have that secured, go ahead and take the back of it And stick a pin in the middle of the closure and now you're ready to start sewing your wig. Now when you start sewing your hair onto the cap, you want to always make sure you go through the first layer of the cap. Only you don't want to go all the way through the cap, because that will hiding the cap. Tighten it tighten that will tighten the cap up and you don't want that now you do see. I don't start right at the beginning, I like to start about an inch lace that and then I sew forward - and this is just for personal reasons, because I don't like for the night of the threads to be right at the hairline. So again, I just start about an inch plays back and then I so forth, and then I just so bad until I'm done and ready to sew on the rest of the culture. So again in case I confused you, I started about it each ways back now. I am at the front, which is this is where you would start if you would like. But again I don't like for the knot on the thread to be right here. So now, since I'm at the front of the hairline, I'm just going to sew all the way back, I do double the thread, maybe once or twice every time I saw, and I just continue to go back again, you're only going to go through that first layer Of the cap, the first layer only when sewing the closure on, I would recommend doing it in section. So I like to start one the left side. First, with one separate needle, then I go and get another needle and salt on the right side and then also on the back and to me this just helps the closure lay flat as possible. So I don't again recommend showing it continuously all the way around. Just take your time and sew them in three different sections so that it lays flat when it comes to laying the tracks, you can flip them over. You can double them or you can cut them. I prefer to cut them because I haven't mastered how to get the tracks to lay really flat without cutting them, so I always cut my tracks and again, you know this is something that you just have to decide what you want to do. Some people don't like to cut them because you do get a little bit more shedding. I do have four bundles of hair, as you saw so to me. The shedding you know unless it's some really horrible hair the little shedding that I'm gon na get from cutting the tracks is not gon na, really make a big difference, because I have so much hair. So I pin the track onto the cap and then I start to sew when I first get the needle I like to sew straight through the track, so I sew through the track first and then I sew around the track because it's faster and it's easier once I get to the other end, I'd like to put the needle directly through the track, and that is how I like to close off that track. So I always sew through the track only when I'm starting or when I'm ending it, and then I go around the track when I'm sewing it throughout the middle. Once I get to the top, I just take the tracks and I just sold them straight across straight across straight across straight across all the way. Until I get to the top, I used to connect the closure with that last track, but I stopped doing that because it does buckle a little as long as your tracks are close to one another and you sew really closely. Try not to alter the shape of the wig like try not to the wig cap. Try not to take your needle through the stitching of the cap, because that will alter the shape of the cap and it probably will be too tight. If you do that, you don't want to mess with those threads. You see, where my hand is where the cap is like stitched together. You don't want to pull your needle through there, but just make sure you stitch really closely when you are stitching, especially at the top, and that's pretty much all you have to do so again, just to recap, I always start by sewing directly through the track. That is how I begin the stitching of the track. Once I get the needle through the track. I go around the track because it's faster and easier for me and then once I get to the end again, I go through the track. I do this all the way throughout the entire week, making sure that my tracks are spaced accordingly, according to how much hair I have when you're done, you just take your cap and carefully cut off the part that is under the lace, so make sure you don't Cut any of the stitching that you stitch to the cap, but you're going to cut directly next to it, so that your lace will be able to show. Last but not least, you want to make sure you cut off the lace in the front of your wig. I'D be it cut minds off-camera. I also added some finishing powder that is close to my skin tone, and this was my final look, so I hope that this video was helpful for you guys if you have any questions, go ahead and leave them down below. For me again, if you're interested in this hair company, I will have the link down below for you in the description box, and I will talk to you later on my next video bye.


Comments
Coils of Love: Wow this unit looks superb! I love how detailed you were in this tutorial. Happy New Year
Lovely Lasean: That hair is bomb. You did a good job!! Love it!
Nikki Laniece: Very informative, you did a great job! Love it, very pretty!!
Tabithas Thrifts: Very informative, thanks so much!
lchildress712: This is Best tutorial I've seen on making wig. Very detallic. Thank you so much.
Simply Sherelle : Love it and that color is super pretty!
M. Jewel 31: Great review and the unit is beautiful!
ava bacardi. obin: THANK YOU sooooo much for explaining the reason why you line up the closure with the edge of he cap!!
Alicia Motley: Good job sis, the unit came out so cute but I couldn't stop staring at those nails!! So pretty
Kayasias11: Gorgeous. Thanks so much for this video. I been wanting to make a wig and didn't want a styrofoam head because my head is big.
Cocoa AlmondJoy: Very detailed. Thanks
Queendom Mindset: I am feeling this! Thumbs up from me! :)
TheStylePerv: love the video girl ... beautiful color...
Melanin Queen: Once you cut the cap under how does the wig stay on your head?
LaTorrie Davis: I need you to teach me!!! Niceeely done!!!
teairra o: I tried using a canvas head and my unit waa stuck to it apparently i sewed it to the head. Any suggestions to prevent this from happening?
Queen P: Did u add clips
GoodTimesWith Ny: First comment